Setup Security Information
Overview
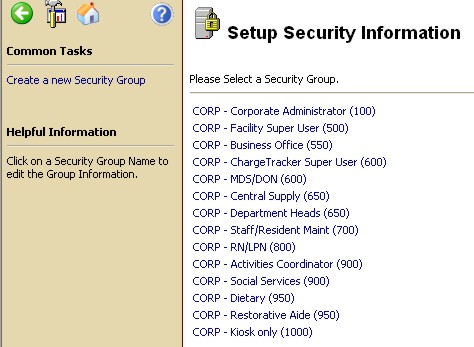
Security Information is set up and maintained
on the Administration tab in CareTracker. As
Security Groups are added, each are assigned an Access Level, with lower
numbers having greater access to the system.
Once security groups have been set up and staff members assigned to
those groups, the security options for all areas of the application can
be established. A
user with administrative access has the ability to set security for their
defined security groups.
To begin setting security options in the
program
- Click on Start Security Mode from the top right-hand
corner of the screen. Lock
icons are displayed throughout the application to indicate where security
can be set.
- Click on a lock to establish the security settings
for each security group starting at the main page of the application and
working your way down to each section and field in the application. For
each area with a lock, a security group can be allowed or denied access.
The Setup Security Information window is
located on the Administrative tab, under Security Maintenance. It displays
all the security groups that are currently set up in your facility. See
example below.
To Create a new Security Group
- From the Security Setup Information window, under
Common Tasks, click Create a new Security Group. The
Add Group window will appear.
- Enter a name and description
for the new security group in the fields provided.
- In the Access Level
field, enter a number to indicate the security level of the new group.
Lower numbers
indicate higher levels of security.
To Edit Group Information
From the Security Setup Information window,
click on a Security Group Name, then select links from that window to
Edit Group Information.