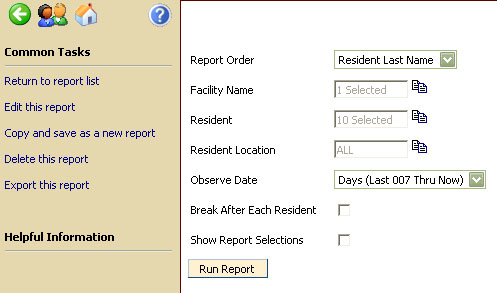
Report Order - This is the sort order for the report. Choose from the pop up list the desired sort order for the report. There are different sort options available depending on the report type. Most common sort is by Resident Name, Room Number, Category, etc. Current selection in the example is to sort by Resident Category.
Resident - To display information for a single resident, choose the resident's name from the pop up list. Default setting is to display information for ALL residents.
Resident Location - This selection filters by Resident Location. Click the icon to the right of the Resident Location filter to see all Resident Locations available for selection. Choose the appropriate Resident Location for this report. Hold the Control Key to choose multiple resident locations. Default setting is ALL.
Observe Date - This field references the date and time an observation was entered into the system. All fields beginning with Observe reference the observations collected. This is used when wanting to see data over a specific date or time range.
Choose CUSTOM to add a specific date range.
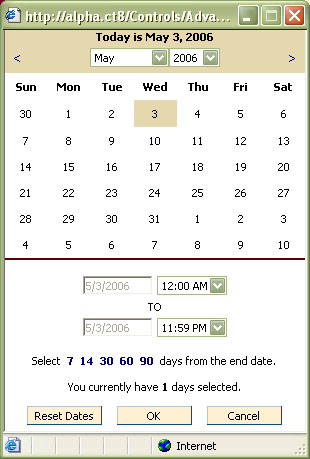
When you choose Custom from the Observe Date selection drop down list, a calendar similar to the one pictured above will appear. Choose a starting and ending date by clicking a day on the calendar. The date range will become highlighted.
You may also choose a date, then click on the "Select 7, 14, 30, 60 90 days from end date" to select a date range of 7, 14, 30, 60, or 90 days prior to the end date selected on the calendar. The default time when you access the custom calendar is 12:00 A.M. to 11:59 P.M. However, you can change these times as desired. Then when you choose a date range, for example, 14 days from end date, the selected times will remain.
Summarize - Click the Summarize check box to print a summary version of the report.
Break after Each Resident - Checking this box will create resident page breaks on the report, giving each resident their own page(s).
Show Report Selections - Checking this box will create an additional page at the end of a report showing a detailed list of all the report selections.
Show Header - To display pre-established header text on a report, mark the checkbox Show Header. By default, the Show Header check box is not marked on any report. Header text is maintained on the Company Maintenance window.
Show Footer - To display pre-established footer text on a report, mark the checkbox Show Footer. By default, the Show Footer check box is not marked on any report. Footer text is maintained on the Company Maintenance window.
Destination - Choose from the destination drop down list Screen, Printer, Email or XML file.
Screen - Report is displayed on the computer screen in PDF file format
Printer - A hard copy is generated to the report designated in facility information
Email - An email notification is sent to the user when the report is sent to be process. Another email is sent to the user when the report completes. The second email has the report attached in PDF format. If the report generates an error, an email will be sent to the user to alert them of the problem.
XML file - This selection will generate a file in XML format. When the report has completed, a prompt will appear indicating where the XML file is located and the file name.
Copy Reports
CareTracker reports can be copied and saved as a new report. To copy a report click Copy and Save as New Report under Common Tasks. Type a name for the new report in the field provided. The new report can be located under the same report grouping/category as the report it was copied from.
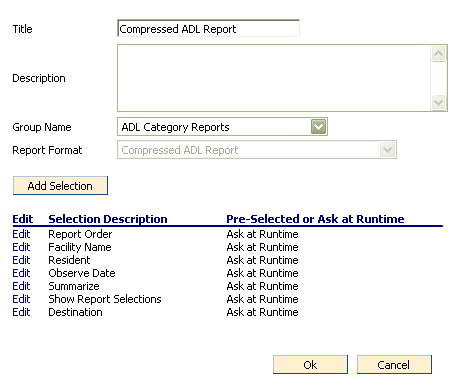
Edit Reports
To edit a report, choose Edit this Report under Common Tasks. A window similar to the following will appear.
Delete Report
Reports can be deleted using the Delete this Report link under Common Tasks. When the user deletes a report it will be sent to a folder under the Administration tab called "Reports Recycle Bin." Click on "Administration" tab, click "All Reports," click "Reports Recycle Bin"... then select a report. The only option on the left is to "Restore Report." This function will place the report back in the folder where it originated. Currently there is no way to empty the recycle bin.
Import Report
To Import a Report