You are here: CareTracker Help > CareTracker > CareTracker Staff

Staff Maintenance
The Staff Maintenance window displays a list of staff members in table
(browse) format. Every
staff member in the facility is listed.
To Add a Staff Member
- Under Common Tasks
click Add
a Staff Member. A
blank staff information window will appear.
- Type information
for the new Staff member in the fields provided.
- Click Okay to save
changes and exit the Staff Information window.
Notes:
- Clicking Cancel,
Back or Home will exit the window without saving changes.
- Clicking Apply will
save changes but not exit the window. Fields that display an asterisk (*) must be filled in.
Fields to Complete in Staff Information
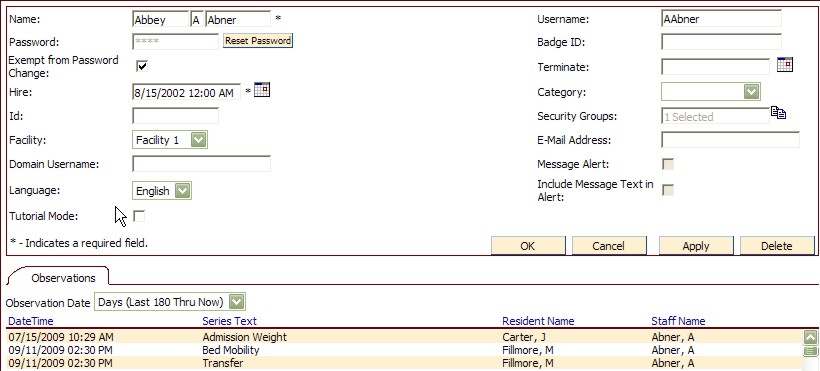
- Name
- First name, middle initial, last name of staff member.
- Password -
Password used when staff member logs into the Kiosk or the CareTracker
Management software.
Reset Password - The Reset Password button allows the staff member's password to be reset via staff maintenance. If the password has been reset using staff maintenance, the next login will be considered the "first use" and will require the staff member to reset their password. When the staff member logs into the application, a window will pop up that will require the user to type in the new password two times, for verification purposes.
Exempt from Password Change - This check box designates a staff member exempt from password change. If checked, the staff member will not be subjected to automatic password changes or any other restrictions set up for their facility.
- Hire
- Date when staff member began working at the facility.
- Id
- May be used when interfacing, or may be completed if the facility uses
employee numbers.
- Facility
- Select appropriate facility name for this staff member from the drop
down list.
- Domain
UserName - This is the user name the staff enters when logging
onto the network server.
- Tutorial
Mode - Mark this checkbox to initiate tutorial mode on the kiosk.
This can
be used when training staff. Observations
made while in tutorial mode are not saved in the "live" observation
database.
- User
Name - The name the staff
member types in the User Name field when logging into the CareTracker
Management Software.
- Badge
Id - This is the number on the staff member's badge that is scanned
by the card reader on the kiosk.
- Terminate
- A terminate date will remove the staff member's name from the kiosk.
- Category
- User defined field. Job
title is most often used, i.e., DON, CNA, etc. New
categories are added in Setup Information.
- Security
Groups - Select appropriate security
group(s) for this staff member from the Security Groups list. The
Security Groups Select list shows the highest security group the currently
logged in staff person is a member of. If
a staff member tries to edit his own security role, they will see the
first security entry selected and will not be able to de-select this group.
The same
also applies if one staff member attempts to edit another staff member
of the same security level. If
you attempt to select the highest group then you will not have access
to change. The purpose of this feature is to allow a staff member to see
the group they are in, and still enforce the hierarchy of security groups.
- Email
Address - Enter the staff member's email address. This
is used in reporting, where a staff member can set up a report destination
of "Email" and the system will email the report to the user
when the report has completed processing. This
is also used in Messaging. If
the Message Alert check box (see #14 and #15 in this topic) is marked
the staff member will receive an email each time they get a new Care Tracker
message. This
requires setup in Resource
Enterprise Manager Website Properties.
- Message
Alert - Any staff person who has this checked must also have an
email address entered in Staff Information. By
having this checked, the staff person will receive an email every time
they receive a new Care Tracker message.
- Include
Message Text in Message Alert - Any staff person who has this checked
must also have an email address entered in Staff Information and also
must have the Message Alert box checked. Checking this box will include
the message text in the message alert.
- Language
- Choose the appropriate language for the currently selected staff person.
To Sort Staff Information
On the staff browse window, click the header of each column to sort
by that column. For
example, to sort the staff list by staff last name, click the word Last
at the top of the last name column.
To Include Terminated Staff Members
Click the Show Terminated Staff Members check box.
To Filter by Staff Category
To display only staff members from a specific staff category, choose
the desired category from the pop up list. This pop up list is in the
upper middle portion of the Staff Information window.
For example, if you want to see only staff members that have a category
of NA, choose NA from the Category pop up list. The
Staff browse list will display only those staff members who have a category
of NA.
To Change Staff Information
- To Edit Staff Information, double click a staff
member in the staff browse list
- Make the necessary changes in the window that
appears.
- Click Ok to save changes and return to the staff
browse window.
Note: CareTracker security will allow a staff member to view other staff
members who have a security level the same as their own but can change
information only on staff members who have a lower security level.
Observation Tab
The Observation tab on the Staff Information window displays resident
observations that have been added by the current staff member. Choose
from the Observation Date pop up list the range of observations to be
displayed. Options
include Today, Last 7 Days, etc. Click
the Refresh button each time a new date range is selected.
Time and Attendance Tab
The Time and Attendance tab, located on the Staff Maintenance screen, contains additional configurable fields required by the Time and Attendance Service.

Fields to Complete on the Time and Attendance Tab
- This staff member is required to clock in and out - This designates whether an employee must clock in and out during their shift. When this is checked, the staff time clock screen will display when the employee logs into CareTracker.
- This staff member is required to clock in and out for meals – This designates whether an employee is required to clock in and out for meals. If this is checked, the employee will have the ability to clock in/out to meals on the staff time clock screen.
- This staff member can change jobs from an approved list when clocking into work - This allows staff to choose which job they are clocking in for. They must select from a list of approved jobs as defined under “Allowed Jobs” on this same screen.
- Employee’s Supervisor - When the Time and Attendance Service is configured to request supervisor approval on time sheets and suggested punches, the staff member designated here will receive and have the ability to approve/deny these requests for the employee. The supervisor is assigned using the TimeSentry application.
- In addition to super users and supervisors, who can approve this staff member’s suggestions and time sheets? – The staff member(s) selected here will also receive and have the ability to approve/deny suggested punches and time sheets for the employee.
- Allowed Jobs - This field contains a list of allowed jobs the employee may select from when clocking into the Time and Attendance System. The jobs are assigned using the TimeSentry application.
- Default Job - The default job is the primary job the employee performs. When clocking in, the employee’s time will be assigned to this job unless another allowed job is selected.
To Run Staff Reports
- Click Run Staff Reports. (Upper
left corner of Staff Information window, under Common Tasks.)
- Make appropriate selections from all filter boxes.
- Click Run Report.